注:最低电脑配置:8G Vram+16G RAM+30G磁盘空间以上,20系列显卡及以上,windows>linux>macos。
文件可以不放在系统盘。举个例子:安装在D盘,在D盘创建一个StableDiffusion文件夹。下载下面文件:
1.下载python版本3.10.6(去python官网下载,安装的时候一定要记得把python加入到环境变量!!!可以安装的路径D:\StableDiffusion\Python\Python310)
2.下载git(https://gitforwindows.org 哪个版本都可以,安装到D:\StableDiffusion\Git)
3.下载stable-diffusion-webui (https://github.com/AUTOMATIC1111/stable-diffusion-webui),使用clone,下载到D:\stableDiffusion\

下载完成之后长,文件夹长这样:

4.下载stable-diffusion的模型。stable-diffusion-v1-5(https://huggingface.co/runwayml/stable-diffusion-v1-5/tree/main)
 。下载完之后,将下载文件放进D:\stableDiffusion\stable-diffusion-webui\models\Stable-diffusion里面。(之后使用时,安装的模型也放在这个里面,比如很流行的Chilloutmixni模型) 。下载完之后,将下载文件放进D:\stableDiffusion\stable-diffusion-webui\models\Stable-diffusion里面。(之后使用时,安装的模型也放在这个里面,比如很流行的Chilloutmixni模型) 。 。
5.打开notepad++,找到这个文件"D:\stableDiffusion\stable-diffusion-webui\webui-user.bat",(记得选择的时候,要选择所有文件!不然找不到.bat文件)。修改.bat文件,(这里的python地址,就是安装的时候的地址哦),然后保存:
- git pull
- @echo off
- set PYTHON="D:\stableDiffusion\Python\Python310\python.exe"
- set GIT=
- set VENV_DIR=
- set COMMANDLINE_ARGS=
- call webui.bat
A:报错pip需要升级。
解决方式: 按照报错提示,升级pip就行啦!
B:pip升级之后的报错,报错:Couldn't install gfpgan
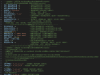
解决方式:这个报错是连不上网,打开"D:\stableDiffusion\stable-diffusion-webui\launch.py",
找到 def prepare_enviroment(): 开头的段落,注意图中红框所示部分,在每个 https://github.com/ 开头的链接前面添加 https://ghproxy.com/ ,变成如图所示的 https://ghproxy.com/https://github.com/ 格式开头。
保存文件,去运行user.bat吧。(参考文章本地部署stable-diffusion-webui出现Couldn't install gfpgan错误的解决方法 - 哔哩哔哩)。
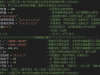
C:pip下载很慢,或者下载不了,直接报错
解决方式:添加一个国内镜像。比如清华镜像。直接在shell里面设置就行。(参考文章pip添加各种国内镜像源(pip下载总是很慢,甚至报错?)_pip 添加源_LiYikou的博客-CSDN博客)
- pip config set global.index-url https://pypi.tuna.tsinghua.edu.cn/simple
这个时候运行起来了。

浏览器页面:

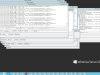
7.在页面的Extensions里面,选择Available,点击load from,报错

解决方法:因为设置了代理,所以需要在文件关掉。 修改webui.bat文件("D:\stableDiffusion\stable-diffusion-webui\webui.bat")。增加一句话:set COMMANDLINE_ARGS=--no-gradio-queue。

修改之后保存,就能正常展示啦。

7.说一下汉化包,在 Extensions-install from url 里面填写地址:GitHub - VinsonLaro/stable-diffusion-webui-chinese: stable-diffusion-webui 的汉化版本
(里面有具体的使用方法,可以参考这个)

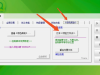
。下载之后,再installed里面将文件展示出来,如果展示不出来,就点击“check for updates”。就有了。

然后点击Apply and restart UI。之后去settings里面修改语言,修改之后Apply settings。再点击旁边的reload ui按钮。

页面变成

至此,安装已经全部完成。如果还有疑问,欢迎在评论区留言,一起探讨。
来源:https://blog.csdn.net/weixin_39921345/article/details/130164203
免责声明:如果侵犯了您的权益,请联系站长,我们会及时删除侵权内容,谢谢合作! |