首先应该有本地部署好的 WEB-UI。
启动项目时打开API接口。
如果你是在Git上copy的项目,在启动web-ui.bat时加上--api的启动参数.

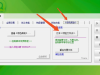
如果是使用秋叶大佬的整合包,请勾选

以及

在这里设置随意用户名和密码。
之后启动Web-UI,确认成功启动。
在python脚本里构建request请求,使用POST,尝试请求图片:
- import requests
- url = "http://127.0.0.1:7860"
- payload = {
- "prompt": "puppy dog",
- "steps": 5
- }
- response = requests.post(url=f'{url}/sdapi/v1/txt2img', json=payload)
- r = response.json()
- print(r)
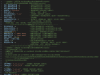
如果结果是:{'detail': 'Not authenticated'}
那么你应该是用的一键启动包进行登录,或是在别的地方设置了用户名和密码,解决方法如下:
启动web-ui后访问 http://localhost:7860/docs

找到这一条:

点开之后是这样的:

点击右上角的 Try it out 按钮,

直接点击Excute提交,网站会弹出让你登录的窗口,输入自己设置的用户名密码即可。
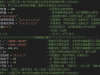
登录后,如果它向你返回的是这样的信息:

说明你已经验证成功了。
接着按F12,开发者工具。

在保持开发者工具打开的情况下,再次点Excute。
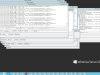
你会在里面看到,有一个POST请求,点开之后长这样,注意我箭头标出来的这个值:

把他复制下来,在你的Python代码里加上如下一行:
- headers = {
- "Authorization": "(里面填写你复制的值,如Basic YWFhYTphYWFh)"
- }
- response = requests.post(url=f'{url}/sdapi/v1/txt2img', json=payload, headers=headers)
当你成功请求图片后,进行如下处理:
- r = response.json()
- for i in r['images']:
- image = Image.open(io.BytesIO(base64.b64decode(i.split(",", 1)[0])))
- image.save('output.png')
- import io
- import base64
- from PIL import Image
在发送请求时,payload里面的值是重点,如果用过sd的应该都比较熟悉了.
这里面大部分都不是必填项,具体每一项的意思,都比较明显,和WebUI里的一一对应,我就不再赘述了。
如果是不太了解json的萌新,可以只选择如下几项:
- payload = {
- "prompt": "puppy dog", # 正面提示词
- "negative_prompt": "wrong hands", # 负面提示词
- "steps": 20 # 步数
- }
payload = {
"enable_hr": false,
"denoising_strength": 0,
"firstphase_width": 0,
"firstphase_height": 0,
"hr_scale": 2,
"hr_upscaler": "string",
"hr_second_pass_steps": 0,
"hr_resize_x": 0,
"hr_resize_y": 0,
"prompt": "", # 提示词
"styles": [
"string"
],
"seed": -1,
"subseed": -1,
"subseed_strength": 0,
"seed_resize_from_h": -1,
"seed_resize_from_w": -1,
"sampler_name": "string",
"batch_size": 1,
"n_iter": 1,
"steps": 50,
"cfg_scale": 7,
"width": 512,
"height": 512,
"restore_faces": false,
"tiling": false,
"do_not_save_samples": false,
"do_not_save_grid": false,
"negative_prompt": "string", # 负面提示词
"eta": 0,
"s_churn": 0,
"s_tmax": 0,
"s_tmin": 0,
"s_noise": 1,
"override_settings": {},
"override_settings_restore_afterwards": true,
"script_args": [],
"sampler_index": "Euler",
"script_name": "string",
"send_images": true,
"save_images": false,
"alwayson_scripts": {}
}
也有更多的可选请求,比较了解http请求和Json数据的老哥请自行访问 http://localhost:7860/docs/
来源:https://blog.csdn.net/qq_36645932/article/details/130183786
免责声明:如果侵犯了您的权益,请联系站长,我们会及时删除侵权内容,谢谢合作! |