stable diffusion 本地化部署安装踩坑指南
提示:这里简述项目相关背景:
AI画图最近流行,小白也要尝试本地部署,压榨N卡性能。
版本为github上的:AUTOMATIC1111/stable-diffusion-webui
官方安装说明如下:
Automatic Installation on Windows
1,Install Python 3.10.6, checking “Add Python to PATH”.
2,Install git.
3,Download the stable-diffusion-webui repository, for example by running git clone https://github.com/AUTOMATIC1111/stable-diffusion-webui.git.
4,Run webui-user.bat from Windows Explorer as normal, non-administrator, user.
问题描述
提示:这里描述项目中遇到的问题:
1,第1,2,3,步的步骤一搜一大把,很容易解决,这里主要讲第4步遇到的各种错误提示,及处理办法。
原因分析:
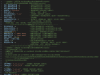
提示:在出现如下截图之前的报错或者安装失败,主要是github上的资源,不能被正常下载和安装。

解决方案:
提示:
当你通过第4步安装时,报的错,几乎都来自于上图两个红色框内的文件,使用git进行下载时,无法正常连接。
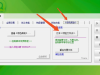
此时需要直接进入对应package所在的网址,挨个下载文件,然后解压缩到对应的stable-diffusion-webui文件夹内的子文件。如下图展示的下载按钮download zip和各个文件对应的子文件所在截图

打开cmd,cd到d:\stable-diffusion-webui\venv\Scripts\GFPGAN-master下。
使用命令d:\stable-diffusion-webui\venv\Scripts\python.exe -m pip install basicsr facexlib安装GFPGAN的依赖。
再使用d:\stable-diffusion-webui\venv\Scripts\python.exe -m pip install -r requirements.txt安装GFPGAN的依赖。
使用d:\stable-diffusion-webui\venv\Scripts\python.exe setup.py develop安装GFPGAN。
安装完毕后,再打开stable diffusion根目录的webui-user.bat会发现不再要求安装GFPGAN。如果遇到其他github上的模块无法安装也可以用同样的方法。
打开cmd,cd到d:\stable-diffusion-webui\venv\Scripts\open_clip-main下。
使用d:\stable-diffusion-webui\venv\Scripts\python.exe setup.py build install安装open_clip。
注意:一定要在自己对应的目录下,运行指令。
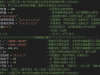
安装完后,会发现各种100%done的提示,然后在运行webui-user.bat,不出意外的话,就是提示你接下来的错误了,需要将下图这些文件夹的内容给放置进去,也就是本文第二个图里的第二个红色框中的地址信息,下载进去,这里可以通过如下指令直接完成,如果显示失败,则可以删除已经存在的,再重复一遍指令。
git clone https://github.com/CompVis/taming-transformers.git “你目录地址\repositories\taming-transformers”
git clone https://github.com/crowsonkb/k-diffusion.git “你目录地址\repositories\k-diffusion”
git clone https://github.com/sczhou/CodeFormer.git “你目录地址\repositories\CodeFormer”
git clone https://github.com/salesforce/BLIP.git “你目录地址\repositories\BLIP”

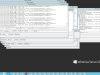
接下来应该是提醒你xformers的问题了,这个直接按下图的文件名添加:

最后是,缺少训练模型了,这里下载ckpt模型4G的即可,太大的电脑吃不消。
最后不出意外的话。。。。。。。。。。。。
。。。。。。。。。。。。。。。。。。。。
。。。。。。。。。。。。。。。。。。。。
。。。。。。。。。。。。。。。。。。。。
。。。。。。。。。。。。。。。。。。。。
。。。。。。。。。。。。。。。。。。。。
。。。。。。。。。。。。。。。。。。。。
。。。。。。。。。。。。。。。。。。。。
。。。。。。。。。。。。。。。。。。。。
感谢各位CSDN里的各路大神的避坑指引,让我小白长经验了。
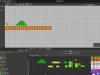
就是你看到我第一个图,运行成功了,借此分享给大家。
关注很久CSDN了,居然因为AI发帖了,时代变了。
来源:https://blog.csdn.net/weixin_51454647/article/details/129845130
免责声明:如果侵犯了您的权益,请联系站长,我们会及时删除侵权内容,谢谢合作! |