1. 首先安装基本工具
- # 安装python环境
- sudo apt install wget git
2. 安装miniconda(也可以自己下载python)
下载最新的安装包
- wget https://repo.anaconda.com/miniconda/Miniconda3-latest-Linux-x86_64.sh
- ./Miniconda3-latest-Linux-x86_64.sh
刷新环境
此时命令行输入python,看到是3.10版本的就对了
- (base) root@localhost:~# python
- Python 3.10.9 (main, Jan 11 2023, 15:21:40) [GCC 11.2.0] on linux
- Type "help", "copyright", "credits" or "license" for more information.
- >>>
3. git拉取项目到本地
执行
- git clone https://github.com/AUTOMATIC1111/stable-diffusion-webui.git
- cd stable-diffusion-webui/
首先安装pytorch和torchvision,若是GPU环境的用户需要安装与cuda版本对应的torch,cpu环境则无具体要求
- pip install torch==1.13.1+cu117 torchvision==0.14.1+cu117 --extra-index-url https://download.pytorch.org/whl/cu117
- pip config set global.index-url https://mirrors.ustc.edu.cn/pypi/web/simple
- pip install -r requirements_versions.txt
进入模型存放对应目录
- cd models/Stable-diffusion/
- wget https://huggingface.co/CompVis/stable-diffusion-v-1-4-original/resolve/main/sd-v1-4-full-ema.ckpt
到这一步网上很多方法都是直接执行根目录下的webui.sh,我执行时有报错,就换了一种方式
回到项目根目录,执行launch.py文件,启动web服务,并指定监听端口为1234(端口号随意)
- python3 launch.py --port 1234 --listen
- export COMMANDLINE_ARGS=--skip-torch-cuda-test
- python3 launch.py --no-half --port 1234 --listen
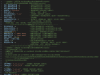
若出现以下内容则说明启动成功

此时访问http://127.0.0.1:1234即可使用
7. 公网访问
若想让服务能在公网上被其他用户访问,则需进入weibu.py文件,修改对应代码,将shared.demo.launch()第一行参数改为share=True。

然后重新启动项目,此时能看到公网地址,说明成功

访问以上临时的公网地址就可以让别人也使用你的AI作图了
8. 汉化扩展
在任意目录下克隆中文扩展地址
- git clone https://github.com/VinsonLaro/stable-diffusion-webui-chinese

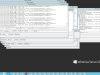
启动web服务后,点击Settings,左侧点击User interface界面,在界面里最下方的Localization (requires restart),选择Chinese-All或者Chinese-English,点击界面最上方的黄色按钮Apply settings,再点击右侧的Reload UI即可完成汉化。


汉化后的页面

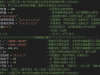
附:遇到的错误
- 报错RuntimeError: Couldn’t clone Stable Diffusion。
解决办法:手动clone
- git clone https://github.com/Stability-AI/stablediffusion.git
- "/root/stable-diffusion-webui/repositories/stable-diffusion-stability-ai"
- 报错gnutls_handshake() failed: The TLS connection was non-properly terminated
解决办法:在执行时使用http而不是https,替换
- git clone https://github.com/Stability-AI/stablediffusion.git
- git clone http://github.com/Stability-AI/stablediffusion.git
- 报错RuntimeError: Couldn’t install open_clip。安装open_clip失败
解决办法:进入launch.py文件,找到openclip_package 部分代码,修改对应部分代码为
- openclip_package = os.environ.get('OPENCLIP_PACKAGE', "git+https://gitee.com/ufhy/open_clip.git@bb6e834e9c70d9c27d0dc3ecedeebeaeb1ffad6b"))
免责声明:如果侵犯了您的权益,请联系站长,我们会及时删除侵权内容,谢谢合作! |