此教程得当若依前后端分离项目,其他项目可以在扩展列表中举行查找。
近期公司里必要对很久以前的RuoYi-Vue前后端分离项目扩展出flowable的功能,当然这个重任也是落在了我的身上(否则也不会有这篇文章),然后我在官网看到了RuoYi-Vue-Flowable这个项目,按照文档提供的迁徙方式对于我们这个老版本的项目来说无法正常运行,以是我联系了作者并更新了一下文档,计划在网上在发布一篇(毕竟有的人懒得看官方文档)。
官方项目地址:https://gitee.com/tony2y/RuoYi-flowable
把项目拉到本地后下面开始整合教程,整合教程分为前端和后端两个模块。
前端迁徙流程
1.flowale功能页面干系内容迁徙
1.1 把目次ruoyi-ui/src/views/下的flowable文件夹移动到你自己前端项目中的/src/views/文件下。

1.2 移动页面配套的js文件,将ruoyi-ui/src/api/下的flowable文件夹移动到自己项目中的/src/api/文件下。

2.flowale流程计划器干系内容迁徙
将ruoyi-ui/src/components目次下的customBpmn,flow,parser,Process,render,tinymce文件夹移动到自己项目中的/src/components文件下。

3.表单计划器与职员选择模块干系文件迁徙
3.1 将ruoyi-ui/src/views/tool中的build文件夹移动到自己项目中的/src/views/tool文件下,存在则覆盖。

3.2 迁徙表单计划器干系样式,将ruoyi-ui/src下的styles文件移动到自己项目中的/src文件夹下。

3.3 修改ruoyi-ui/src/utils/index.js中的deepClone函数。

修改为如下内容,存在该函数做修改,不存在做新增。
- // 深拷贝对象
- export function deepClone(obj) {
- const _toString = Object.prototype.toString
- // null, undefined, non-object, function
- if (!obj || typeof obj !== 'object') {
- return obj
- }
- // DOM Node
- if (obj.nodeType && 'cloneNode' in obj) {
- return obj.cloneNode(true)
- }
- // Date
- if (_toString.call(obj) === '[object Date]') {
- return new Date(obj.getTime())
- }
- // RegExp
- if (_toString.call(obj) === '[object RegExp]') {
- const flags = []
- if (obj.global) { flags.push('g') }
- if (obj.multiline) { flags.push('m') }
- if (obj.ignoreCase) { flags.push('i') }
- return new RegExp(obj.source, flags.join(''))
- }
- const result = Array.isArray(obj) ? [] : obj.constructor ? new obj.constructor() : {}
- for (const key in obj) {
- result[key] = deepClone(obj[key])
- }
- return result
- }

3.5 迁徙表单计划器干系图标,将ruoyi-ui/src下的icons文件移动到自己项目中的/src文件夹下。

4. 流程表达式、流程监听器干系内容迁徙
4.1 干系页面迁徙,将ruoyi-ui/src/views/system下的expression,listener文件夹移动到自己项目中的/src/views/system文件夹下。

4.2 干系js文件迁徙,将ruoyi-ui/src/api/system下的expression.js,listener.js文件移动到自己项目中的/src/api/system文件夹下。

5. main.js中引入组件

main.js中连合上图添加如下代码。
- import Tinymce from '@/components/tinymce/index.vue'
-
- Vue.component('tinymce', Tinymce)

package.json中连合上图添加如下依赖。
- "bpmn-js": "^11.1.0",
- "diagram-js": "^11.4.1",
- "xcrud": "^0.4.19",
- "vkbeautify": "^0.99.3",
在ruoyi-ui/src/router/index.js文件中添加路由配置,差异的ruoyi版本路由写法不同等,请参照自己项目路由举行添加。
参考如下:
- {
- path: '/flowable',
- component: Layout,
- hidden: true,
- children: [
- {
- path: 'definition/model/',
- component: () => import('@/views/flowable/definition/model'),
- name: 'Model',
- meta: { title: '流程设计', icon: '' }
- }
- ]
- },
- {
- path: '/flowable',
- component: Layout,
- hidden: true,
- children: [
- {
- path: 'task/finished/detail/index',
- component: () => import('@/views/flowable/task/finished/detail/index'),
- name: 'FinishedRecord',
- meta: { title: '流程详情', icon: '' }
- }
- ]
- },
- {
- path: '/flowable',
- component: Layout,
- hidden: true,
- children: [
- {
- path: 'task/myProcess/detail/index',
- component: () => import('@/views/flowable/task/myProcess/detail/index'),
- name: 'MyProcessRecord',
- meta: { title: '流程详情', icon: '' }
- }
- ]
- },
- {
- path: '/flowable',
- component: Layout,
- hidden: true,
- children: [
- {
- path: 'task/myProcess/send/index',
- component: () => import('@/views/flowable/task/myProcess/send/index'),
- name: 'SendRecord',
- meta: { title: '流程发起', icon: '' }
- }
- ]
- },
- {
- path: '/flowable',
- component: Layout,
- hidden: true,
- children: [
- {
- path: 'task/todo/detail/index',
- component: () => import('@/views/flowable/task/todo/detail/index'),
- name: 'TodoRecord',
- meta: { title: '流程处理', icon: '' }
- }
- ]
- },
- {
- path: '/tool',
- component: Layout,
- hidden: true,
- children: [
- {
- path: 'build/index',
- component: () => import('@/views/tool/build/index'),
- name: 'FormBuild',
- meta: { title: '表单配置', icon: '' }
- }
- ]
- }
删除node_modules文件夹,控制台实行npm install下载完毕后启动项目即可。
由于参加了流程校验器,迁徙项目后启动错误请实行以下下令
- npm install create-bpmnlint-plugin -D
1. 在父级pom文件中参加如下依赖
- <!-- properties -->
- <properties>
- <flowable.version>6.7.2</flowable.version>
- </properties>
- <!-- dependency -->
- <dependency>
- <groupId>com.ruoyi</groupId>
- <artifactId>ruoyi-flowable</artifactId>
- <version>${ruoyi.version}</version>
- </dependency>
- <dependency>
- <groupId>io.swagger</groupId>
- <artifactId>swagger-annotations</artifactId>
- <version>1.5.21</version>
- <scope>compile</scope>
- </dependency>
- <dependency>
- <groupId>org.flowable</groupId>
- <artifactId>flowable-spring-boot-starter</artifactId>
- <version>${flowable.version}</version>
- </dependency>
- <dependency>
- <groupId>com.baomidou</groupId>
- <artifactId>mybatis-plus-boot-starter</artifactId>
- <version>3.4.0</version>
- </dependency>
- <!--el表达式计算-->
- <dependency>
- <groupId>com.googlecode.aviator</groupId>
- <artifactId>aviator</artifactId>
- <version>5.3.3</version>
- </dependency>
- <!--modules -->
- <modules>
- <module>ruoyi-flowable</module>
- </modules>

2. 把RuoYi-flowable项目中的ruoyi-flowable文件夹整个迁徙到自己项目中

3. 在admin项目标pom文件中引入ruoyi-flowable项目
- <dependency>
- <groupId>com.ruoyi</groupId>
- <artifactId>ruoyi-flowable</artifactId>
- </dependency>
根据若依项目标版本差异,缺少的实体类,mapper,service也会有所差异,以是必要根据flowable项目中所提示缺少的类举行针对性的拷贝,假如为service接口记得补全对应的controller。
5. 在admin项目标yml配置文件中新增如下配置
application.yml文件中添加如下配置
- # flowable相关表
- flowable:
- # true 会对数据库中所有表进行更新操作。如果表不存在,则自动创建(建议开发时使用)
- database-schema-update: false
- # 关闭定时任务JOB
- async-executor-activate: false
6. 迁徙数据库表
新建一个库实行tony-flowable.sql文件,flowable项目中少什么表就将对应的表导入到自己的数据库中,mysql数据库版本要用5.7。

7. 数据迁徙
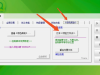
将sys_menu对应下图红框中的菜单数据参加到自己的表中。

将sys_dict_type对应下图红框中的字典类型数据添加到自己的表中。

将sys_dict_data对应下图红框中的字典数据添加到自己的表中。

8. 启动项目
第一次启动时必要把yml配置文件中的database-schema-update设置为true,如许会自动创建flowable中所必要的全部表。
完成上述操作后就可以在自己项目中正常利用了。

来源:https://blog.csdn.net/TangBoBoa/article/details/129481865
免责声明:如果侵犯了您的权益,请联系站长,我们会及时删除侵权内容,谢谢合作! |