配景
在工业上利用较多的基于深度学习从目的检测算法,那毫无疑问应该是yolo,依附这服从和精度方面的上风,在一众深度学习目的检测算法中脱颖而出。目前最新的版本是yoloV7,根据yoloV7论文中形貌:
YOLOv7 surpasses all known object detectors in both speed and accuracy in the range from 5 FPS to 160 FPS and has the highest accuracy 56.8% AP among all known real-time object detectors with 30 FPS or higher on GPU V100. YOLOv7-E6 object detector (56 FPS V100, 55.9% AP) outperforms both transformer-based detector SWIN L Cascade-Mask R-CNN (9.2 FPS A100, 53.9% AP) by 509% in speed and 2% in accuracy, and convolutional based detector ConvNeXt-XL Cascade-Mask R-CNN (8.6 FPS A100, 55.2% AP) by 551% in speed and 0.7% AP in accuracy, as well as YOLOv7 outperforms: YOLOR, YOLOX, Scaled-YOLOv4, YOLOv5, DETR, Deformable DETR, DINO-5scale-R50, ViT-Adapter-B and many other object detectors in speed and accuracy. Moreover, we train YOLOv7 only on MS COCO dataset from scratch without using any other datasets or pre-trained weights
已知对象检测算法中得到了最高的精度,达到了 56.8% 的匀称精度(AP),而且服从远超基于transformer(transformer-based)和基于卷积(convolutional-based)的模子。而且训练只利用了coco数据集,没有任何预训练权重。
今天试着下载看了下,发现文档分析齐备。今天大概花了一天时间,完成了从配情况,预备数据集,训练模子到tensorRT部署等多个步调。
也得益于之前用过yolov3,对深度学习这一套流程比较熟悉。平常也有点工程经验,遇到的坑险些网上一查大概仔细一琢磨,根本就办理了。接下来就对这一过程做个记录。
参考资料:
YOLOV7论文地址:https://arxiv.org/pdf/2207.02696.pdf
YOLOV7源码地址:https://github.com/WongKinYiu/yolov7
YOLO进化史:https://zhuanlan.zhihu.com/p/539932517
YOLOV7 tensorRT部署:https://zhuanlan.zhihu.com/p/556570703
源码下载
从github克隆代码:https://github.com/WongKinYiu/yolov7
情况设置
这是一个python工程,保举利用PyCharm。
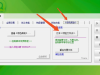
笔者利用的是Windows体系,如果不消conda的话,只能利用PyCharm提供的假造情况功能,在工程下新建一个python情况,这个情况不会影响别的工程。Pycharm会辨认requirements.txt中必要的包,自动提示你安装。
这里的torch必要注意,如果利用默认的requirements.txt中版本,可能GPU不会启用,体现就是:
- import torch
- torch.cuda.is_available() #返回值为false
https://pytorch.org/get-started/locally/

这里笔者的情况供参考:
cuda:10.2
cudnn:8.2.2.26
TensorRT:8.2.2.1
这些版本肯定要匹配,笔者在这儿踩过坑,把cuda重新安装了一遍,又下载了好几版的cudnn和tensorRT才测试乐成。
测试数据集预备
yolov7测试数据集是coco,因此下载了coco val2017数据集,train2017暂时没有下载。
在data/coco.yaml文件中:
- # download command/URL (optional)
- download: bash ./scripts/get_coco.sh

val2017就够了,要本身训练的话,可以下载train2017,可以看到笔者也在下载train2017。
同样在data/coco.yaml中,设置文件路径
- # train and val data as 1) directory: path/images/, 2) file: path/images.txt, or 3) list: [path1/images/, path2/images/]
- train: H:/baiduyundownloads/coco2017/train2017.txt # 118287 images
- val: H:/baiduyundownloads/coco2017/val2017.txt # 5000 images
- test: H:/baiduyundownloads/coco2017/test-dev2017.txt # 20288 of 40670 images, submit to https://competitions.codalab.org/competitions/20794
精度测试
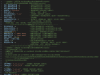
然后可以运行
- python test.py --data data/coco.yaml --img 640 --batch 32 --conf 0.001 --iou 0.65 --device 0 --weights yolov7.pt --name yolov7_640_val

训练模子
- python train.py --workers 8 --device 0 --batch-size 32 --data data/coco.yaml --img 640 640 --cfg cfg/training/yolov7.yaml --weights '' --name yolov7 --hyp data/hyp.scratch.p5.yaml
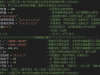
模子导出为onnx
- python export.py --weights ./yolov7-tiny.pt --dynamic-batch --grid --simplify --topk-all 100 --iou-thres 0.65 --conf-thres 0.35 --img-size 640 640
这里选择yolov7-tiny模子,执行下令后,天生yolov7-tiny.onnx。
tensorRT部署
利用这个堆栈
https://github.com/shouxieai/tensorRT_Pro
下的tensorRT_Pro/example-simple_yolo/目次中的工程,可以将.onnx模子转为.trtmodel模子。

然后可以用这个模子,在c++端举行推理:

推理效果写到文件:

来源:https://blog.csdn.net/iamqianrenzhan/article/details/127178904
免责声明:如果侵犯了您的权益,请联系站长,我们会及时删除侵权内容,谢谢合作! |