vue3利用quilleditor
本文是封装成组件利用
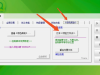
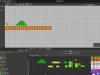
先放结果图

- // 安装插件
- npm install @vueup/vue-quill@alpha --save
- // 局部引入
- import { QuillEditor } from '@vueup/vue-quill'
- import '@vueup/vue-quill/dist/vue-quill.snow.css'

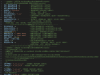
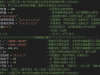
全部代码如下,
- <template>
- <div>
- <!-- 此处注意写法v-model:content -->
- <QuillEditor ref="myQuillEditor"
- theme="snow"
- v-model:content="content"
- :options="data.editorOption"
- contentType="html"
- @update:content="setValue()"
- />
- <!-- 使用自定义图片上传 -->
- <input type="file" hidden accept=".jpg,.png" ref="fileBtn" @change="handleUpload" />
- </div>
- </template>
- <script setup>
- import { QuillEditor } from '@vueup/vue-quill'
- import '@vueup/vue-quill/dist/vue-quill.snow.css'
- import { reactive, onMounted, ref, toRaw, watch } from 'vue'
- const props = defineProps(['value'])
- const emit = defineEmits(['updateValue'])
- const content = ref('')
- const myQuillEditor = ref()
- // 通过watch监听回显,笔者这边使用v-model:content 不能正常回显
- watch(() => props.value, (val) => {
- toRaw(myQuillEditor.value).setHTML(val)
- }, { deep: true })
- const fileBtn = ref()
- const data = reactive({
- content: '',
- editorOption: {
- modules: {
- toolbar: [
- ['bold', 'italic', 'underline', 'strike'],
- [{ 'size': ['small', false, 'large', 'huge'] }],
- [{ 'font': [] }],
- [{ 'align': [] }],
- [{ 'list': 'ordered' }, { 'list': 'bullet' }],
- [{ 'indent': '-1' }, { 'indent': '+1' }],
- [{ 'header': 1 }, { 'header': 2 }],
- ['image'],
- [{ 'direction': 'rtl' }],
- [{ 'color': [] }, { 'background': [] }]
- ]
- },
- placeholder: '请输入内容...'
- }
- })
- const imgHandler = (state) => {
- if (state) {
- fileBtn.value.click()
- }
- }
- // 抛出更改内容,此处避免出错直接使用文档提供的getHTML方法
- const setValue = () => {
- const text = toRaw(myQuillEditor.value).getHTML()
- }
- const handleUpload = (e) => {
- const files = Array.prototype.slice.call(e.target.files)
- // console.log(files, "files")
- if (!files) {
- return
- }
- const formdata = new FormData()
- formdata.append('file', files[0])
- backsite.uploadFile(formdata) // 此处使用服务端提供上传接口
- .then(res => {
- if (res.data.url) {
- const quill = toRaw(myQuillEditor.value).getQuill()
- const length = quill.getSelection().index
- quill.insertEmbed(length, 'image', res.data.url)
- quill.setSelection(length + 1)
- }
- })
- }
- // 初始化编辑器
- onMounted(() => {
- const quill = toRaw(myQuillEditor.value).getQuill()
- if (myQuillEditor.value) {
- quill.getModule('toolbar').addHandler('image', imgHandler)
- }
- })
- </script>
- <style scoped lang="scss">
- // 调整样式
- :deep(.ql-editor) {
- min-height: 180px;
- }
- :deep(.ql-formats) {
- height: 21px;
- line-height: 21px;
- }
- </style>
- <template>
- <div class="page">
- <Editor :value="emailForm.msg" @updateValue="getMsg" />
- </div>
- </template>
- <script setup>
- import Editor from '@/components/Editor/index.vue'
- const emailForm = reactive({
- test_msg: ''
- })
- const getMsg = (val) => {
- emailForm.msg = val
- }
- </script>
- <template>
- <div>
- <QuillEditor ref="myQuillEditor"
- theme="snow"
- v-model:content="content"
- :options="data.editorOption"
- contentType="html"
- @update:content="setValue()"
- />
- <!-- 使用自定义图片上传 -->
- <input type="file" hidden accept=".jpg,.png" ref="fileBtn" @change="handleUpload" />
- </div>
- </template>
- <script setup>
- import { QuillEditor } from '@vueup/vue-quill'
- import '@vueup/vue-quill/dist/vue-quill.snow.css'
- import { reactive, onMounted, ref, toRaw, watch } from 'vue'
- // import { backsite } from '@/api'
- const props = defineProps(['value'])
- const emit = defineEmits(['updateValue'])
- const content = ref('')
- const myQuillEditor = ref()
- // watch(() => props.value, (val) => {
- // console.log(toRaw(myQuillEditor.value))
- // toRaw(myQuillEditor.value).setHTML(val)
- // }, { deep: true })
- const fileBtn = ref()
- const data = reactive({
- content: '',
- editorOption: {
- modules: {
- toolbar: [
- ['bold', 'italic', 'underline', 'strike'],
- [{ 'size': ['small', false, 'large', 'huge'] }],
- [{ 'font': [] }],
- [{ 'align': [] }],
- [{ 'list': 'ordered' }, { 'list': 'bullet' }],
- [{ 'indent': '-1' }, { 'indent': '+1' }],
- [{ 'header': 1 }, { 'header': 2 }],
- ['image'],
- [{ 'direction': 'rtl' }],
- [{ 'color': [] }, { 'background': [] }]
- ]
- },
- placeholder: '请输入内容...'
- }
- })
- const imgHandler = (state) => {
- if (state) {
- fileBtn.value.click()
- }
- }
- const setValue = () => {
- const text = toRaw(myQuillEditor.value).getHTML()
- emit('updateValue', text)
- }
- const handleUpload = (e) => {
- const files = Array.prototype.slice.call(e.target.files)
- // console.log(files, "files")
- if (!files) {
- return
- }
- const formdata = new FormData()
- formdata.append('file', files[0])
- // backsite.uploadFile(formdata)
- // .then(res => {
- // if (res.data.url) {
- // const quill = toRaw(myQuillEditor.value).getQuill()
- // const length = quill.getSelection().index
- // // 插入图片,res为服务器返回的图片链接地址
- // quill.insertEmbed(length, 'image', res.data.url)
- // // 调整光标到最后
- // quill.setSelection(length + 1)
- // }
- // })
- }
- onMounted(() => {
- const quill = toRaw(myQuillEditor.value).getQuill()
- if (myQuillEditor.value) {
- quill.getModule('toolbar').addHandler('image', imgHandler)
- }
- toRaw(myQuillEditor.value).setHTML(props.value)
- })
- </script>
- <style scoped lang="scss">
- :deep(.ql-editor) {
- min-height: 180px;
- }
- :deep(.ql-formats) {
- height: 21px;
- line-height: 21px;
- }
- </style>
来源:https://blog.csdn.net/moanuan/article/details/128240291
免责声明:如果侵犯了您的权益,请联系站长,我们会及时删除侵权内容,谢谢合作! |