大话stable-diffusion-webui系列
主要介绍stable-diffusion-webui的 主题开发、插件开发 等内容,感兴趣的朋友可以订阅下!
大话Stable-Diffusion-Webui-客制化主题(一)
大话Stable-Diffusion-Webui-客制化主题(二)
大话Stable-Diffusion-Webui-客制化主题(三)
不定时更新中...
AMD显卡请看这篇文章
stable-diffusion-webui手动安装详细步骤(AMD显卡)
前提
首先不建议去安装stable-diffusion-webui的一键安装包,既然学习就一次性把它学会。然后,最主要的是一键安装有以下问题:
1、安装包的中的torch版本与自己的CUDA版本不兼容,最后虽然可以运行程序,但是根本不会激活GPU去加速渲染图形,导致渲染一副图形的速度极慢
2、stable-diffusion-webui建议的python版本是3.10,但是python3.10可能无法通过pip或者conda去下载某些CUDA版本对应的torch,导致最后程序无法启动
问题
笔者在安装过程中遇到的问题:
CUDA版本是10.2,使用python3.10去下载torch包时始终取法找到CUDA10.2对应的torch包,这个问题困扰了我一天,之后发现python3.10目前是不支持cuda10.2版本的torch包的,可以通过 CUDA版本对应的torch去查看,最终通过先升级显卡驱动(升级CUDA版本)再下载对应CUDA版本的CUDAToolKit,再下载CUDA版本对应的torch包即可。
环境
OS:Windows10
显卡类型:NVIDIA(英伟达)
Python版本:3.10.6(必须为该版本)
Git:必须
安装过程
升级CUDA驱动
笔者这里由于遇到了以上所述问题,所以先要升级CUDA驱动,如果是更高版本的驱动可以跳过该步骤。
需要根据自己显卡类型去下载相应的驱动,win + x ->设备管理器 ->显示适配器

然后去 CUDA驱动 填写对应的显卡信息后搜索显卡驱动

笔者这里选择第一个驱动进行下载,下载之后是一个exe文件,直接按照步骤安装即可,过程比较简单不再赘述

安装完成后查看CUDA版本,笔者这里是11.4.176

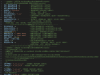
或者是使用命令nvidia-smi查看,可以看到CUDA版本是11.4,相应的驱动版本是472.84
- PS C:\Users\samsung> nvidia-smi
- Sat Apr 1 14:02:38 2023
- +-----------------------------------------------------------------------------+
- | NVIDIA-SMI 472.84 Driver Version: 472.84 CUDA Version: 11.4 |
- |-------------------------------+----------------------+----------------------+
- | GPU Name TCC/WDDM | Bus-Id Disp.A | Volatile Uncorr. ECC |
- | Fan Temp Perf Pwr:Usage/Cap| Memory-Usage | GPU-Util Compute M. |
- | | | MIG M. |
- |===============================+======================+======================|
- | 0 NVIDIA GeForce ... WDDM | 00000000:01:00.0 Off | N/A |
- | N/A 0C P8 N/A / N/A | 75MiB / 4096MiB | 0% Default |
- | | | N/A |
- +-------------------------------+----------------------+----------------------+
- +-----------------------------------------------------------------------------+
- | Processes: |
- | GPU GI CI PID Type Process name GPU Memory |
- | ID ID Usage |
- |=============================================================================|
- | 0 N/A N/A 14052 C+G ...IA GeForce Experience.exe N/A |
- +-----------------------------------------------------------------------------+
如果原来装过CUDA ToolKit请先卸载
CUDA ToolKit
找到CUDA驱动版本对应的CUDA ToolKit版本下载,由于笔者这里的CUDA驱动版本是472.84,所以CUDA ToolKit版本选择11.4.4,CUDA驱动版本与CUDA ToolKit对应关系


下载好之后是一个exe文件,cuda_11.4.4_472.50_windows.exe,可以看到名字中含有可以使用该CUDA ToolKit的最小CUDA驱动为472.50。安装很简单,这里不再赘述。
最终查看CUDA的实际版本,nvcc --version
- PS C:\Users\samsung> nvcc --version
- nvcc: NVIDIA (R) Cuda compiler driver
- Copyright (c) 2005-2021 NVIDIA Corporation
- Built on Mon_Oct_11_22:11:21_Pacific_Daylight_Time_2021
- Cuda compilation tools, release 11.4, V11.4.152
- Build cuda_11.4.r11.4/compiler.30521435_0
cuDNN版本
cuDNN是一个神经网络学习的加速库,因为stable-diffusion-webui中根据一些模型进行文本生图时可以用该包加快渲染速度。找到与CUDA版本一直的cuDNN下载

下载后将该压缩包解压,将里面的全部文件复制到CUDA安装的目录下,路劲为:
C:\Program Files\NVIDIA GPU Computing Toolkit\CUDA\v11.4

注:可以看到虽然有同名文件夹,但是没有同名文件,所以cuDNN的文件在复制到CUDA中时是不会提示要覆盖的情况,如果有,那么一定是哪里出错了
克隆项目地址
stable-diffusion-webui

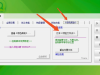
克隆github项目自行查询,比较简单不再赘述。如果由于网络的原因无法克隆,可以先将项目fork到 自己的 https://gitee.com/ 仓库(国内仓库访问较快),然后再克隆到本地,方法如下:


此时 git clone https://… 去把项目克隆到本地就行
安装Pytorch
笔者这里使用Anaconda安装了一个python3.10.6的虚拟环境,当然大家也可以不使用Anaconda,直接下载安装python3.10.6也是可以的
pytorch
需要安装CUDA版本对应的Pytorch版本,如果不是使用Annconda,请使用pip install指令下载pytorch

笔者这里本应该安装CUDA11.4对应的pytorch,但是pytorch官网中目前并没有提供该版本,于是安装了CUDA11.3对应的pytorch版本,该版本可以在CUDA11.4中使用
- # 创建一个python3.10.6的虚拟环境,并命名为 sdui
- (base) C:\Users\samsung>conda create -n sdui python==3.10.6
- ...
- #激活创建的虚拟环境 sdui
- (base) C:\Users\samsung>conda activate sdui
- # 安装pytorch,等待时间取决于网速
- (sdui) C:\Users\samsung>conda install pytorch torchvision torchaudio pytorch-cuda=11.3 -c pytorch -c nvidia
- #测试torch是否安装成功
- (sdui) C:\Users\samsung>python
- Python 3.10.6 | packaged by conda-forge | (main, Oct 24 2022, 16:02:16) [MSC v.1916 64 bit (AMD64)] on win32
- Type "help", "copyright", "credits" or "license" for more information.
- >>> import torch
- >>> torch.cuda.is_available()
- # true代表成功使用torch
- True
注意:如果不是使用Anaconda安装的虚拟python环境,那么首先需要双击 webui-user.bat运行后会在项目根目录下生成一个虚拟的python环境(其实是拷贝了系统已经安装的python版本到webui的指定目录),即\venv\Scripts\python.exe,后续安装的python依赖包都是需要通过该虚拟python环境中的python命令去下载的
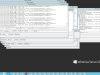
(2023-06-12)近期很多同学反应双击webui-user.bat安装时过程中会反复报错,其实大多数的错误是由于在安装过程中会去github拉去依赖包时超时而导致的,本质原因是不能顺利的访问github,于是可以给在需要去github拉去依赖的代码处加上代理地址:
(旧版本stable-diffusion-webui加代理):进入webui根目录下,编辑launch.py,全局搜索https://github.com,然后在前面加上https://ghproxy.com/前缀,即最终变成了https://ghproxy.com/https://github.com,记得保存!
(新版本stable-diffusion-webui加代理):如果要给新版本的sd加代理,那么和以上的方式不太一样了(2023-05-29):
需要进入到sd根目录下的modules文件夹,然后编辑launch_utils.py

这样安装过程应该会顺利很多!
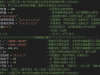
- # 进入项目根目录,安装项目 requirements.txt 中要求的依赖。可以添加给pip或者conda添加国内镜像,这样可以加快下载速度。如何添加镜像这里不再赘述。
- (sdui) D:\AI\project\stable-diffusion-webui>python -m pip install -r requirements.txt
- #启动项目
- (sdui) D:\AI\project\stable-diffusion-webui>python launch.py
- Python 3.10.6 | packaged by conda-forge | (main, Oct 24 2022, 16:02:16) [MSC v.1916 64 bit (AMD64)]
- Commit hash: 22bcc7be428c94e9408f589966c2040187245d81
- Installing clip
- Installing open_clip
- Traceback (most recent call last):
- File "D:\AI\project\stable-diffusion-webui\launch.py", line 355, in <module>
- prepare_environment()
- File "D:\AI\project\stable-diffusion-webui\launch.py", line 269, in prepare_environment
- run_pip(f"install {openclip_package}", "open_clip")
- File "D:\AI\project\stable-diffusion-webui\launch.py", line 129, in run_pip
- return run(f'"{python}" -m pip {args} --prefer-binary{index_url_line}', desc=f"Installing {desc}", errdesc=f"Couldn't install {desc}")
- File "D:\AI\project\stable-diffusion-webui\launch.py", line 97, in run
- raise RuntimeError(message)
- RuntimeError: Couldn't install open_clip.
- Command: "C:\Users\samsung\.conda\envs\sdui\python.exe" -m pip install git+https://github.com/mlfoundations/open_clip.git@bb6e834e9c70d9c27d0dc3ecedeebeaeb1ffad6b --prefer-binary
- Error code: 1
- stdout: Looking in indexes: https://mirrors.cloud.tencent.com/pypi/simple
- Collecting git+https://github.com/mlfoundations/open_clip.git@bb6e834e9c70d9c27d0dc3ecedeebeaeb1ffad6b
- Cloning https://github.com/mlfoundations/open_clip.git (to revision bb6e834e9c70d9c27d0dc3ecedeebeaeb1ffad6b) to e:\temp\pip-req-build-godg7jm4
- stderr: Running command git clone --filter=blob:none --quiet https://github.com/mlfoundations/open_clip.git 'E:\temp\pip-req-build-godg7jm4'
- fatal: unable to access 'https://github.com/mlfoundations/open_clip.git/': OpenSSL SSL_read: SSL_ERROR_SYSCALL, errno 10054
- error: subprocess-exited-with-error
- git clone --filter=blob:none --quiet https://github.com/mlfoundations/open_clip.git 'E:\temp\pip-req-build-godg7jm4' did not run successfully.
- exit code: 128
- See above for output.
- note: This error originates from a subprocess, and is likely not a problem with pip.

- (sdui) D:\AI\project\stable-diffusion-webui>python -m pip install open_clip_torch
- (sdui) D:\AI\project\open_clip>python setup.py build install
- (sdui) D:\AI\project\stable-diffusion-webui>python launch.py
- Python 3.10.6 | packaged by conda-forge | (main, Oct 24 2022, 16:02:16) [MSC v.1916 64 bit (AMD64)]
- Commit hash: 22bcc7be428c94e9408f589966c2040187245d81
- Cloning Stable Diffusion into D:\AI\project\stable-diffusion-webui\repositories\stable-diffusion-stability-ai...
- Cloning Taming Transformers into D:\AI\project\stable-diffusion-webui\repositories\taming-transformers...
- Traceback (most recent call last):
- File "D:\AI\project\stable-diffusion-webui\launch.py", line 355, in <module>
- prepare_environment()
- File "D:\AI\project\stable-diffusion-webui\launch.py", line 289, in prepare_environment
- git_clone(taming_transformers_repo, repo_dir('taming-transformers'), "Taming Transformers", taming_transformers_commit_hash)
- File "D:\AI\project\stable-diffusion-webui\launch.py", line 151, in git_clone
- run(f'"{git}" clone "{url}" "{dir}"', f"Cloning {name} into {dir}...", f"Couldn't clone {name}")
- File "D:\AI\project\stable-diffusion-webui\launch.py", line 97, in run
- raise RuntimeError(message)
- RuntimeError: Couldn't clone Taming Transformers.
- Command: "git" clone "https://github.com/CompVis/taming-transformers.git" "D:\AI\project\stable-diffusion-webui\repositories\taming-transformers"
- Error code: 128
- stdout: <empty>
- stderr: Cloning into 'D:\AI\project\stable-diffusion-webui\repositories\taming-transformers'...
- fatal: unable to access 'https://github.com/CompVis/taming-transformers.git/': Failed to connect to github.com port 443: Timed out
- (sdui) D:\AI\project\stable-diffusion-webui\repositories\taming-transformers>python setup.py build install
- # 注意:这里有一个坑,如果不是使用Anaconda生成的虚拟python环境的话,而是直接安装的python环境的话,项目启动时会在项目根目录下生成一个虚拟的python环境,后续步骤安装的python依赖包都是通过该虚拟环境的python指令安装的,所以,此时应该进入到该虚拟python环境的目录下,使用该虚拟环境的python去执行 python setup.py build install 这样的指令。
- 虚拟环境python路径:项目根目录\venv\Scripts\python.exe
[code](sdui) D:\AI\project\stable-diffusion-webui>python launch.pyPython 3.10.6 | packaged by conda-forge | (main, Oct 24 2022, 16:02:16) [MSC v.1916 64 bit (AMD64)]Commit hash: 22bcc7be428c94e9408f589966c2040187245d81Cloning Taming Transformers into D:\AI\project\stable-diffusion-webui\repositories\taming-transformers...Cloning K-diffusion into D:\AI\project\stable-diffusion-webui\repositories\k-diffusion...Cloning CodeFormer into D:\AI\project\stable-diffusion-webui\repositories\CodeFormer...Cloning BLIP into D:\AI\project\stable-diffusion-webui\repositories\BLIP...Installing requirements for CodeFormerInstalling requirements for Web UILaunching Web UI with arguments:No module 'xformers'. Proceeding without it.==============================================================================You are running torch 1.12.1.The program is tested to work with torch 1.13.1.To reinstall the desired version, run with commandline flag --reinstall-torch.Beware that this will cause a lot of large files to be downloaded, as well asthere are reports of issues with training tab on the latest version.Use --skip-version-check commandline argument to disable this check.==============================================================================Downloading: "https://huggingface.co/runwayml/stable-diffusion-v1-5/resolve/main/v1-5-pruned-emaonly.safetensors" to D:\AI\project\stable-diffusion-webui\models\Stable-diffusion\v1-5-pruned-emaonly.safetensors100%|█████████████████████████████████████████████████████████████████████████████| 3.97G/3.97G [16:22 |